K2ImageLCD
K2ImageLCD is a powerful advanced tool designed for converting and optimizing images for low-resolution monochrome LCD screens (up to 240×128 real pixels).
Unlike simple converters, this software enables granular and professional control through dynamic masks, letting you apply different effects, brightness levels and edge algorithms to specific zones of the same image — solving common issues such as uneven lighting or loss of detail in critical areas.
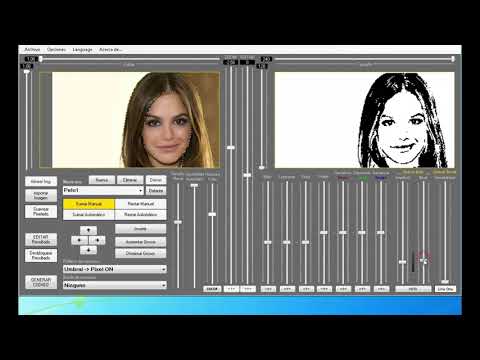
Video Tutorials
 ▶
▶
 ▶
▶
 ▶
▶
 ▶
▶
Introduction
K2ImageLCD is a professional tool designed to convert images into binary dot maps for low-resolution monochrome LCD screens. It transforms any image — photograph, logo or illustration — into on/off pixels that can be displayed on a real LCD.
The main challenge with small LCDs is that each pixel only has two states: on or off. Simple black-and-white conversions rarely produce good results. K2ImageLCD solves this with a system of independent zones called masks, which let you apply different parameters to each part of the image.
Smart Processing Logic
Instead of a simple conversion, K2ImageLCD uses a real-time rendering engine that analyses the image pixel by pixel to ensure the final result is readable on very low-resolution screens.
Dynamic Binarization Algorithm
El programa no se limita a convertir la imagen a blanco y negro. Utiliza un sistema de Umbralización por Rangos. En lugar de un punto de corte fijo, el motor analiza la luminancia de cada zona y permite definir una "ventana" de brillo. Solo los píxeles que caen dentro de ese rango de amplitud se activan en el LCD. Esto permite rescatar detalles en imágenes oscuras que otros programas simplemente convertirían en una mancha negra.
Intelligent Edge and Contour Analysis
For logos and vector graphics, the software implements a brightness-gradient algorithm that detects colour differences between adjacent pixels.
| ›Contour isolation | Permite extraer solo la "silueta" de un objeto. |
| ›LineOne mode | Función de optimización que reduce el grosor de cualquier borde detectado a la mínima unidad (1 píxel), evitando que los gráficos se vean toscos o "empastados" en la pantalla monocromática. |
Main Features
Workflow
The typical process follows these steps. Order matters: some controls lock as soon as you move to the next phase.
Import the image — Load the source file (BMP, JPG, PNG, GIF, TIFF).
Configure the LCD resolution — Set the actual width and height of your screen before doing anything else.
Adjust position, zoom and stretch — Frame the image within the LCD area. This step must be completed before creating masks.
Adjust colour (optional) — Correct brightness, contrast or hue if the image requires it.
Set the threshold — Define which tones are converted to lit pixels. Press Auto for an automatic starting point.
Create masks (if needed) — For images with problematic zones, create one mask per zone and adjust each threshold independently.
Add text (optional) — Overlay labels using any font installed on Windows.
Final manual editing (optional) — Touch up individual pixels. This step locks all other controls.
Generate code — Export the result as a data array ready for your firmware.
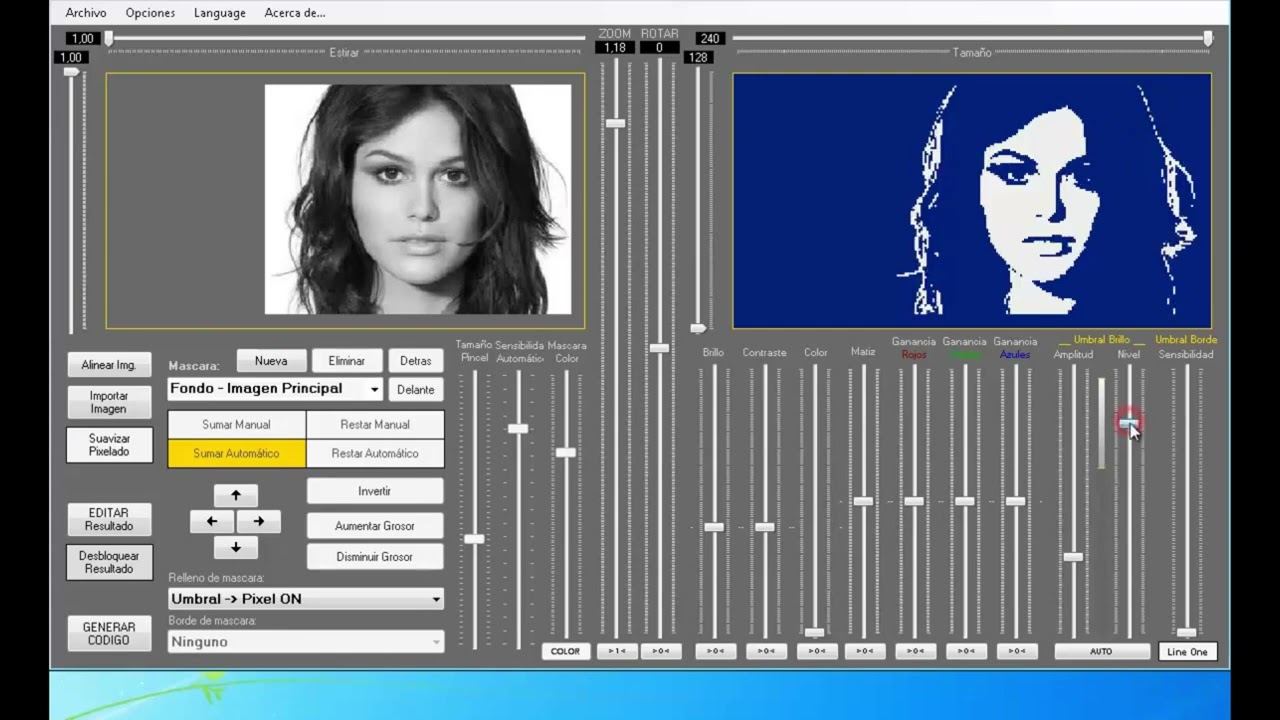
The Interface
| Area | Description |
|---|---|
| Left panel | Shows the original image with position, zoom and stretch adjustments applied. Also displays the active mask with the brush overlay. |
| Panel derecho | Muestra el resultado digitalizado tal y como aparecería en el LCD real, con los colores de simulación activos. Enmarcado en dorado para indicar el área activa. |
| Controls panel | Position/size, colour, threshold, masks, text and export controls. |
Import Image
Go to File → Import image or press the Load button. Supported formats: BMP, JPG, PNG, GIF and TIFF. When importing, if you had unsaved changes in a previous project, the program will ask whether you want to save them.
LCD Colour Simulation
The right panel can show the result with the exact colours of the target LCD. Access via Options → LCD Colour.
The Custom option lets you define the exact two colours of your screen using a colour picker.
Position and Size
These controls frame exactly which part of the image will appear on the LCD. They must be set before creating any mask, as once mask work has started these controls are locked.
Click and drag on the left panel to freely reposition the image.
Zooms in or out while the cursor is over the left panel. You can also use the zoom bar.
Distorts the image horizontally or vertically, useful for matching the aspect ratio to the LCD.
Rotates the image. Useful for images taken in the wrong orientation.
Places the image in the top-left corner of the LCD area automatically.
Moves the image pixel by pixel with more precision than free mouse dragging.
Colour Adjustments
These modify the image before the threshold converts it to black and white. Each mask has its own colour values, independent of the rest.
| Control | Effect |
|---|---|
| Brightness | Increases or reduces the overall luminosity of the zone. Useful for underexposed images. |
| Contrast | Expands or reduces the difference between light and dark tones. High contrast makes binarization easier. |
| Colour | Adds or removes saturation without altering brightness. The brightness threshold works with luminance, so this control does not affect it. |
| Hue | Rotates the colour wheel: shifts all image colours by X degrees across the spectrum. |
| R / G / B Gain | Amplifies or attenuates each channel separately. Example: for a more yellow image without increasing brightness, raise R and G and lower B. |
Pixelation Smoothing
When the original image has lower resolution than the working area, scaling it up causes pixelation. The Smooth pixelation option applies interpolation to reduce it.
| Mode | Result | Recommended for |
|---|---|---|
| No smoothing | Visible pixelation, hard edges. | Pixel art, images already in pure black and white. |
| Bicubic | Moderate smoothing, good detail. | General use. |
| Bilinear | Medium smoothing. | General use. |
| High-quality bicubic | Best sharpness/smoothing balance. | Photos and complex logos. |
| High-quality bilinear | Can be slightly blurry. | Specific cases. |
Brightness Threshold
The brightness threshold is the main digitization control. It defines which image tones are converted to lit pixels. It works on a visual bar ranging from black (0) to white (255).
Level shifts the window towards dark or light tones. Amplitude controls the width: high amplitude activates more tones, low amplitude is more selective.
Threshold by LCD type
| LCD type | Threshold zone | Why |
|---|---|---|
| Positive (light background, dark pixels) | Low / dark tones | Lit pixels represent dark areas of the image. |
| Negative (dark background, light pixels) | High / light tones | The program generates the negative that the LCD inverts visually. |
Edge Threshold
While the brightness threshold works with each pixel's luminance, the edge threshold is designed to extract contours and silhouettes, especially in logos and flat-colour graphics where no gradients exist.
| ›Sensitivity | Controls how much brightness must differ between neighbouring pixels to be considered an edge. High sensitivity detects subtle edges; low sensitivity only detects sharp changes. |
| ›Line One option | Forces the width of all detected edges to exactly 1 pixel, eliminating duplicates. Very useful on low-resolution screens where 2-pixel lines take up too much space. |
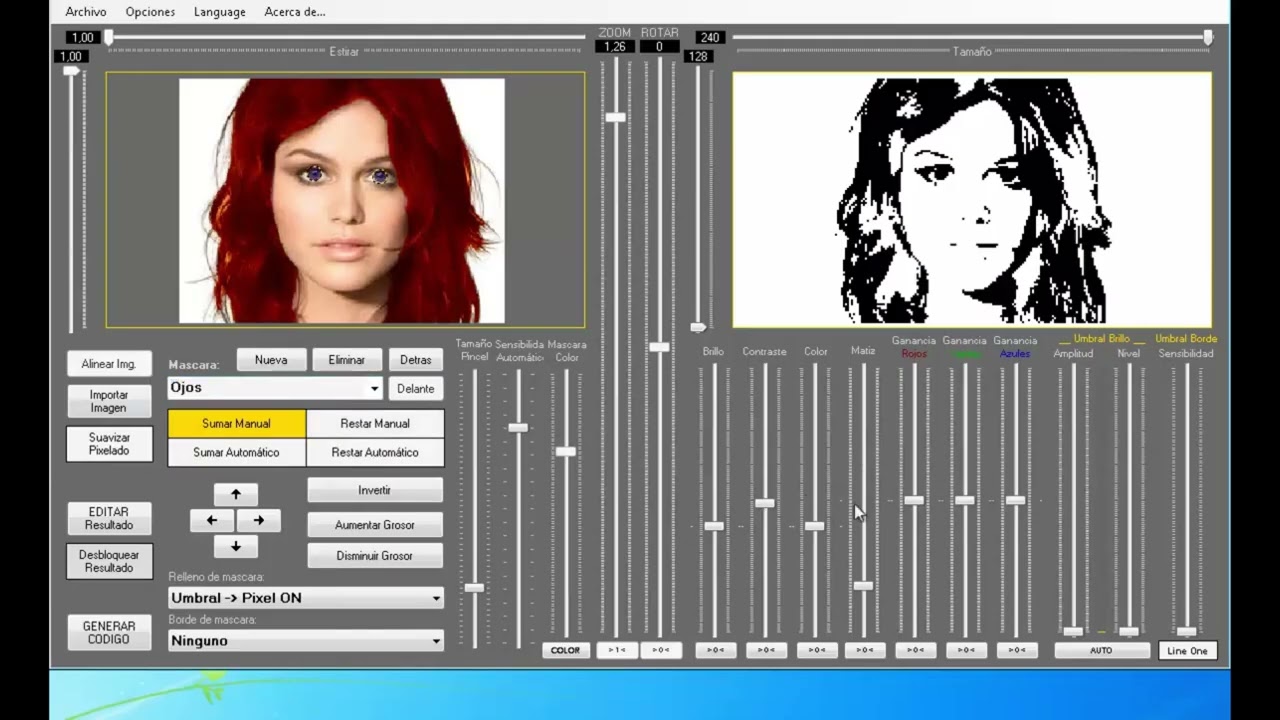
What is a mask?
A mask is a delimited zone of the image to which its own independent colour and threshold parameters are applied. The program supports up to 15 simultaneous masks, plus the background (main image), which always exists as the base layer.
Masks are the solution when an image has zones with very different lighting, contrast or colour conditions. Without masks, any adjustment that improves one zone worsens another.
Creating Masks
Press Add mask to create a new one. Its shape can be defined in three ways:
Paint over the left panel to add zones. Subtract mode removes zones. Brush size is adjusted with the slider or the mouse wheel.
Clic en la imagen y el programa detecta el borde del área por similitud de color. La Sensitivity controla cuánta diferencia de color se tolera como borde.
Select a colour from the image and the program marks all pixels of that colour in one go. The level bar adjusts how many similar tones are included.
Every mode has a subtract variant. Use it to correct zones included by mistake or to refine the edges of an automatic selection.
Recommended strategies
| ›Flat-colour logos | Use the By Colour mode. Define one mask per logo colour. This is the fastest and most precise approach. |
| ›Photographs | Start with low automatic sensitivity and manually subtract any incorrect zones. |
| ›Hard-to-detect edges | If the edge is not detected well from the inside, detect from the outside and then subtract the exterior. You can undo the last operation with Ctrl+Z. |
Fill Types
Each mask can be configured with a fill type for its interior and optionally for its outer border.
Interior fill
Outer border
Each mask can have an outer border with its own fill type (ON, OFF or NOT) and adjustable thickness using the Increase/Decrease thickness buttons.
Mask Order and Name
| ›Label | Each mask can have a descriptive name (hair, eyes, mouth, K2…) to easily identify it in the list. |
| ›Front / Back | Controls the compositing order. Masks at the front can overwrite those at the back in overlapping zones. |
| ›Invert mask | Inverts the pixel selection. Useful when it is easier to select the exterior than the interior. |
| ›Delete mask | Deletes the selected mask and all its settings. |
Independent Thresholds per Mask
Each mask has its own colour and threshold controls, completely independent from the rest. This is the most powerful feature of the program.
Practical example: photographic portrait
| Zone | Typical problem | Mask solution |
|---|---|---|
| Dark hair | Detail is lost or merges with the background. | Mask with threshold adjusted to dark tones. |
| Hair highlights | With threshold set for dark hair, highlights disappear. | Second mask only for highlights, threshold at light tones. |
| Eyes | If adjusted for eyes, the mouth disappears. | Eye mask with its own threshold. |
| Mouth | If adjusted for mouth, the eyes are overloaded. | Independent mouth mask. |
| Background | Takes up space and distracts from the subject. | Background mask with solid OFF fill or clipped to the silhouette. |
Use with negative LCD
| ›Background | Set the background (main image) to Solid ON to light all background pixels. |
| ›Masks | Configura cada zona con relleno OFF en lugar de ON, para "apagar" los píxeles de la figura. |
| ›Thresholds | Move the thresholds towards light tones. |
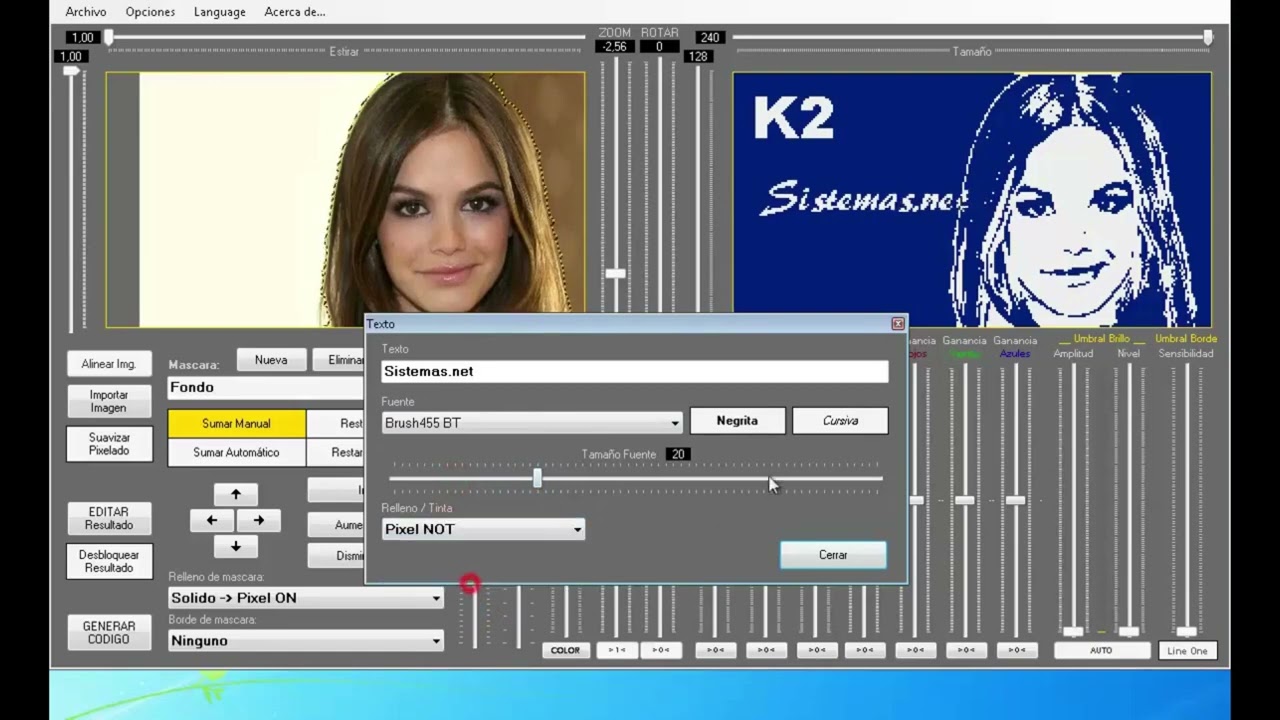
Text Overlay
Text can be overlaid using any font installed on Windows. The text is converted to pixels in the same way as the image.
Adding and positioning text
Position the cursor over the right panel. The cursor changes to text shape.
Click where you want to insert the text. The editor opens.
Type the text, choose font, size and style (bold, italic).
Select the fill type and confirm.
Text fill types
Click and drag to reposition the text. Double-click to edit its properties again. The program supports up to 15 simultaneous text elements.
Manual Editing
The Edit result button activates a mode in which the cursor becomes a pencil to modify individual pixels directly on the digitized result.
- The right mouse button toggles between generating ON (lit) and OFF (unlit) pixels.
- The brush size is adjusted with the mouse wheel.
- Ideal for removing small noise dots generated by the automatic algorithms.
Generate Code
Press Generate code to open the export dialog.
| Option | Description |
|---|---|
| Label | Nombre del array o variable en el código generado. |
| Format | Binary, Decimal or Hexadecimal depending on what your compiler or LCD library accepts. |
| Controller | Target LCD controller model (determines the bit order within each byte). |
| Connector | LCD pin configuration. |
| Pin orientation | Top or Bottom: determines whether data is read top to bottom or in reverse. |
When you press Generate code, the result is automatically copied to the clipboard ready to paste into your IDE.
Projects
K2ImageLCD saves the complete work state in project files with the .K2Image extension: imported image, masks, colour and threshold parameters, text, LCD simulation and position.
| ›Save | Saves the current project. If it is the first time, it asks for a location and name. |
| ›Load | Opens an existing .K2Image project. |
| ›Add result mask | Incorporates the current result as an additional mask, useful for combining several work passes. |
Interface language
The interface is available in Spanish and English. Change the language from Options → Language. The preference is saved automatically for the next session.
Installation FAQ
1. Why is this software not digitally signed?
This software is a completely free, non-profit project. Obtaining and maintaining an official Microsoft digital signature involves a high annual cost that is unfortunately not viable for a free project.
2. How can I verify that the application is safe?
Transparency is our priority. Before running the installer, you can scan it on VirusTotal or any other external security tool. There you can verify, using dozens of antivirus engines simultaneously, that the file is 100% free of viruses and malware.
3. Windows is blocking the installation and won't let me continue — what should I do?
This happens due to a Windows 11 feature called Smart App Control. This tool automatically blocks any software that is not digitally signed, regardless of whether it is safe or not. As an independent developer, the system prevents installation by default.
To install the application, you can temporarily disable this feature by following these steps:
Open the Windows Security menu.
Go to the App & browser control section.
Click on Smart App Control settings.
Change the status to Off.
WHAT DOES K2ImageLCD OFFER?
- Maximum resolution up to 240×128 real pixels.
- System of up to 15 masks with completely independent colour and threshold parameters.
- Automatic edge detection with sensitivity control and Line One mode.
- Visual simulation of any LCD colour before exporting.
- Code generation in binary, decimal or hexadecimal, ready to paste into firmware.
- Interface available in Spanish and English, with preference saving.
FORMATS AND COMPATIBILITY
- Imports BMP, JPG, PNG, GIF and TIFF.
- Exports code compatible with T6963 and AK0108 LCD controllers.
- Text fonts from the installed Windows system.
- Projects saved in .K2Image format to continue work in another session.
- Free distribution for personal and professional use, no registration or activation required.
- Desktop application for Windows with installer and uninstaller included.
Support the project
If K2ImageLCD has been useful to you, please consider making a donation.
Every contribution helps maintain and improve the projects.